TUTORIAL #1: COUCH WITH WINGS


I needed some furniture for Gramma McBitty's house, so I constructed a chair, the foundation of which was some kind of little letter holder or something which already had the shape of the wings. I had to remove the short front side and add legs after upholstering. Hint for legs: I utilize little dowels inserted into holes drilled in the feet and the seat to ensure greater bonding (glued into both holes). I have a mini mitre saw which allows me to cut small dowels and wooden sticks for furniture, and believe me I use it a lot. I bought it for about $50 on Ebay, and I think that included shipping.
After doing the chair, I began the couch, and tried to take pictures to make this tutorial, but somewhere along the way I forgot to snap shots of each step, so I will have to describe the final steps without visual aids.
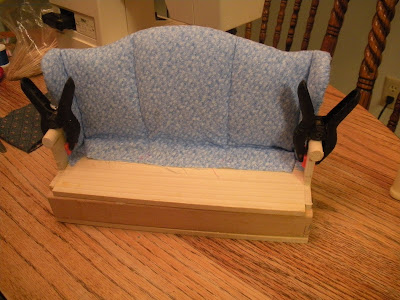
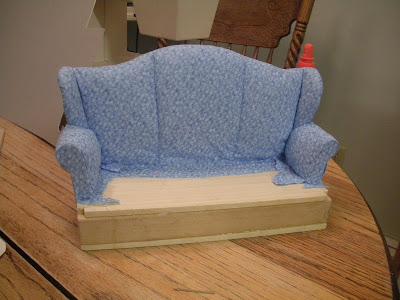
Okay, here is the frame. I was totally making this up as I went so in some cases had to add strips to get the dimensions I needed. I had some bent 1/4 inch thick 4 inch wide strips, so I took advantage of that warping to make the wings flare slightly. I used my scroll saw to cut the top of the back and the side shapes and cut the other pieces with the standard size mitre saw from various pieces of craft wood I had on hand (1/4 inch).
I slanted the back, but after progressing further on the couch, realized that it might have been better to slant it more. This picture shows the degree of slant--not really enough. (The water bottle is to hold it flat, because of the slant it tended to tip toward the back at this stage)

I trimmed the armrests so that the tops were angled for a smooth fit to the dowels that would go there. I got one done with the scroll saw set at an angle, but it wouldn't work with the other, but I found it quite easy to trim off the wood with a utility knife as it went with the grain.
Okay, upholstering: I glued batting to the wood, I cut pieces to cover the wings, and I glued them to the wood where the glued part would not show.
I had more material than I needed on the arms so cut it away, but made sure I could cover the inner corner between wing and arm.
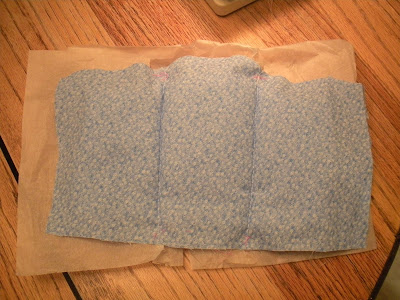 I cut a piece of material for the back and sandwiched batting between the material and tissue paper, then sewed through it all to create the cushiony look. After removing the tissue paper, I glued it to the frame, tucking it under at the sides to create a neat finish where the material was already covering the wings. I glued the batting directly to the frame all across the back and then trimmed the top edge of the material, snipping it so I could glue it down tightly on the back side.
I cut a piece of material for the back and sandwiched batting between the material and tissue paper, then sewed through it all to create the cushiony look. After removing the tissue paper, I glued it to the frame, tucking it under at the sides to create a neat finish where the material was already covering the wings. I glued the batting directly to the frame all across the back and then trimmed the top edge of the material, snipping it so I could glue it down tightly on the back side.
I then glued the dowels onto the armrests. I utilized wood glue for all of the framework.
 Next I glued batting to the armrests. I used tacky glue for this part.
 I cut shapes for the front of the armrests from cardboard and then cut material for the fronts.
 I glued this right over the batting as tightly as I could get it (next time around I think I will try sewing the front to the material that will go over the armrest.)
 Next I took pieces of material and glued them over the tops of the armrests, gluing very tightly under the outside of the dowels to get a good stretch. Folding the material under and pulling it tightly around the wings created a clean intersection there. I glued the material in places that would ultimately be covered to avoid any signs of glue on the couch, except that I had to glue around the pieces on the fronts of the armrests. I used the glue sparingly and tried to get it tight to the edges. It worked out okay on this material.


 Here you can see me checking to make sure the side pieces would line up with the back.
Next I glued batting to the armrests. I used tacky glue for this part.
I cut shapes for the front of the armrests from cardboard and then cut material for the fronts.
Next I took pieces of material and glued them over the tops of the armrests, gluing very tightly under the outside of the dowels to get a good stretch. Folding the material under and pulling it tightly around the wings created a clean intersection there. I glued the material in places that would ultimately be covered to avoid any signs of glue on the couch, except that I had to glue around the pieces on the fronts of the armrests. I used the glue sparingly and tried to get it tight to the edges. It worked out okay on this material.
I cut a long strip of material to go all across the back and on the outsides of the armrests. I cut a piece of cardboard to fit over the back of the couch and glued the top edge.
I carefully cut pieces to fit on each end. I started with a shape that was larger than I needed and keep paring it down and fitting it against the couch until I had the right shape for each end. In this picture you can see the cushion. I sewed the front edges on the sewing machine so as to cover a piece of foam cut to size, then tied french knots right through the foam to create the tufts and cushiony look. I don't have pictures of that part. The rest of the material could then be glued around the cushion and glued to the framework.
Here you can see me checking to make sure the side pieces would line up with the back.
I glued piping made from long strips of material along the top of the back and the wings to give a finished look where the inside and outside edges of the upholstery would meet. Foolishly, I did not put string into the piping on the back, thinking that it would work on this small scale, but realized I had to by the time I got to the wings (I started glued along the back) and added some string inside the material for the piping on the wings. I then glued the outside cardobard back on. I had already glued the top of the material to the cardboard. It was at this point that I carefully snipped the material that was on either side of the back and fitted it around the end cardboard forms. This was a little tricky but I wanted to have a smooth finish to this outside part and I had to make sure the material would not be wrinkled or glued unevenly. When the end parts of the outside material piece were glued to the cardboard forms, I glued the forms themselves to the outside of the armrests and wings, getting the forms tight up against the piping. I added large wooden beds for feet to the couch.
Voila!